A maze like pattern made by copy stamping 3 different shapes onto a grid.


 High Viscosity and Surface Tension
 Lattice SOP
 I used two different but similar game sprites, Mario and Luigi from the original Mario Bros. game. They only differ in color palette. The color attribute is blended down the Y-axis to get a nice gradient as the paper blows away.
 With so many stacks of particles, I needed each of the stacks' particles to be grouped from top to bottom at a random rate. The first step was to set an attribute that specifies the "stack number" in SOPs. I set the Alpha ($CA) point attribute equal to the point number ($PT) of the template. That stack number ($CA) is kept after the Copy SOP so that the particles can use it.
 Next, in the particle network, I created a random step curve in CHOPs which goes up by increments of 1 at a random rate. I created as many curves as I needed. The names of these curves will correspond to the stack number of the particle.
 Finally, by using an expression, I got the particles to group from top to bottom. The modulo operator is very useful. Particles within this group will be effected by the wind and other forces.


 Sprite Sheet
 Pick out a specific sprite
 Houdini Network
 VOPSOP Network
 Boxes copied to remaining points
 Grid SOP
 16-Bit Sprite
 Arcade Size
 Guilty Gear vs Street Fighter
 In the details view in DOPs, when two objects are colliding with each other, an Impact record will appear on each object involved. It will only appear on the frame where they touch, and will disappear until they interact again.
 If you look at one object's Impact record, you can see object ID of the other object involved, the simulation time at which it took place, etc. The main piece of data I used in CHOPs from the record was the flags data, which is just "flagging" that the data exists and is set to a value of zero.
 After bringing the raw Impact flags to CHOPs using a Dynamics CHOP, I needed to make some math adjustments and then record the graph.
 Then I added a Spring CHOP to it and exported it to the bumpers' scale, ....
 and in another branch use a Lag CHOP and bring it to the bumpers' color.
 I started with a 4x2 grid, and deleting primitives to create the tetrominos in the game. Each tetromino consists of 4 primitives.

 RBD Object DOP
 Group DOP
 RBD State DOP
 Motion DOP
 CHOP Network
 Resulting curve for side to side motion.
 DOP Network
 It is based on the luminance that the object gets from the lights in the scene. After the Lighting VOP, I used a Luminance VOP to get monochrome values, which range from 0 to 1. Then these values are color ramped. This yeilds a basic toon effect.
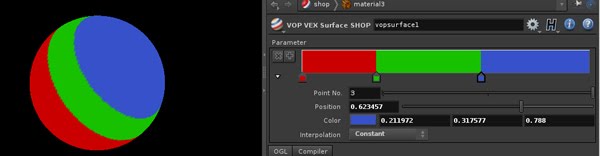 Using Constant Type ramping. You can add as many colors to the ramp as possible.
 Since I gave the Wireframe VOP UV coordinates, it is best to add UVs to the geometries in SOPs.
 Micropolygon Rendering
 VEX Network.
 2D Vector Sliders. Model by Anthony Brown.
 When my script is loaded, it brings up a window where the user can type in a series of speech sounds, or phonemes, in the text field. Each phoneme must be seperated by a space. If you want the character to hold a mouth movement for a little while longer, add a space then a hyphen ' - ' after the phoneme. If you want the character to close its mouth after the series is done, add a space, then a period ' . ' . When you are done, set the time increment that you want each mouth movement to set a keyframe. (Default is 5). Once you are done, click "Process Words". The script will automatically set key frames for the Sync, Lips, and Tounge sliders of the rig for each phomene by the given increment.
 Phoneme Charts